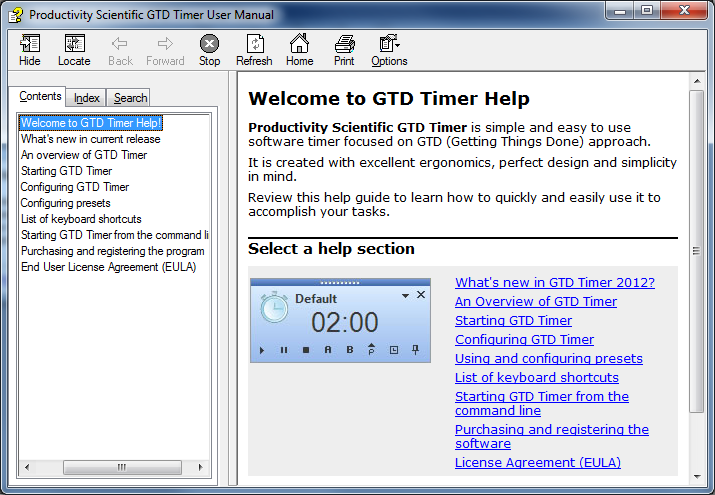
GTD Timer
Contents
- What's new in GTD Timer 2015?
- Why I need this software?
- See how GTD Timer supports Pomodoro Technique
- Use case: Implement GTD Two Minute rule into your everyday life
- Use case: Set time budget for any task
- Use case: Watch time left to completion of some particular activity
- Use case: Personal reminder
- Use case: Run commands at a specified time
- Use case: Access services with waiting queues effectively
- Video demonstrations
- Screenshots
- Quick product tour
Why I need this software?
Use case: Implement GTD Two Minute rule into your everyday life
David Allen, author of Getting Things Done approach recommends:
If the Next Action can be done in 2 minutes or less, do it when you first pick the item up. Even if that item is not a "high priority", because it takes longer to store and track any item than to deal with it the first time its in your head. - David Allen, Getting Things Done, p.191
Generally, this rule means: if some task can be done in less than two minutes, do it now.
Productivity Scientific GTD Timer starts with predefined time of two minutes by default and you can start countdown with one keystroke. Of course this does not mean that you can countdown only for two minutes - any reasonable time period may be used from seconds to hours.
Use case: Set time budget for any task
Time budgeting is a very popular time management technique, because time likes counting like money does. And even more, because you can get more money but you can't get more time - all people get the same amount of time each day - only 24 hours. That's why it is incredibly important to set a time budget for certain activities similar to process of setting money budget before making purchases.
GTD Timer helps to set time budget by limiting amount of time that you are planning to spend for a particular activity. Before starting anything, ask yourself how much time you are willing to invest in that activity. Launch GTD Timer with planned amount of time and stick to your time budget.
Use case: Watch time left to completion of some particular activity
GTD Timer can be used to display amount of time which is left before completion of some activity. You can use it as auction timer, presentation timer, kitchen timer, display time left for rest break or working day. You can set time period to countdown or enter time when the activity ends using "T" prefix (see).
Use case: Personal reminder
GTD Timer is very suitable as personal reminder. When starting timer you may enter message to yourself and this message will pop-up when timer will finish countdown. You may start any number of timers simultaneously (available in registered version) with different reminders.
Using presets and commands you can automate reminders. For example, you can create reminder preset which opens e-mail client and use it when you create reminder to send letter for anybody (with "mailto" command). Using "net send" command you can create reminder which sends message for other people in local network.
Use case: Run commands at a specified time
Using presets with commands GTD Timer is exceptionally suitable to use as scheduler to run commands at a specified time. For example, you can create preset to shutdown a computer after some task finishes (as described in documentation).
You can use virtually any command: launch programs, run batch files or single commands and so on.
Use case: Access services with waiting queues effectively
Many online services place users to waiting queue for some amount of time. For example, RapidShare file sharing service allows unlimited downloads only with RapidShare Premium Accounts, but if you use free account you have to wait for some amount of time between downloads. It is annoying to remember exact time when to return to window of the browser. GTD Timer is very helpful in such situation.
Screenshots
GTD Timer's main window
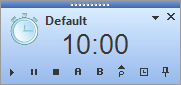
Floating semitransparent main window of GTD Timer displaying preset caption,
time and control buttons. Visit link to see main window shortcuts
Pomodoro Work Session running
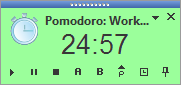
GTD Timer running built-in Pomodoro Work Session preset.
See more about Pomodoro technique support.
GTD Timer displays overtime
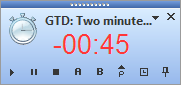
GTD Timer displays overtime in GTD: Two minute rule preset.
Stopwatch running
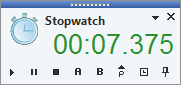
GTD Timer running in stopwatch mode.
Time Report
Sample Time Report in HTML form shown in the picture below. Visit Time Report page for detailed description.

Sample Time Report in HTML form
Timer's window shown with Tray Icon and Context Menu
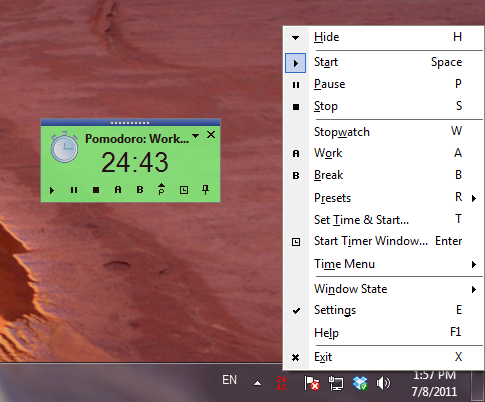
GTD Timer main window (on the left), context menu (on the right)
and tray icon displaying time (on the bottom near lower left corner of the context menu).
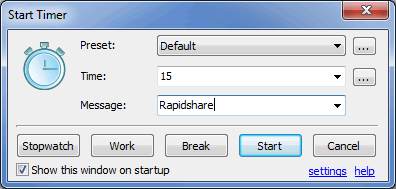
Start Timer window

Start Timer window appears on the software start (configurable) and allows to run GTD Timer with desired parameters. See how to use Start Timer window.
Settings window
Open settings window to configure the software. See how to configure the GTD Timer.
Preset settings window

Preset support is powerful and unique feature of GTD Timer. Use presets to run the software from one click or keystroke with set of predefined parameters. Read more about using and configuring presets.
Help system is accessible via F1 keystroke, context menu and buttons. It contains full description of software features and usage examples.
Take a quick product tour
Starting GTD Timer
When starting GTD Timer opens Start Timer window (see in the picture below).

Use this window to setup parameters for the timer. To navigate between controls use Tab key. If you want to skip this window, click Cancel button or press Esc key on the keyboard. After entering parameters press one of the buttons at the bottom of the window.
Parameters:
- Preset (required, default value automatically chosen) - presets used to run GTD Timer with predefined parameters or to distinguish between different instances of the running software. Button with semicolon near this field allows to setup chosen preset. See Using and configuring presets help section for more information.
- Run for (required to press Start button) - enter period of time for the timer. Input time from keyboard or use mouse wheel to quckly scroll for any number of hours, minutes or seconds. Click 'Run for' label to switch to other modes ('Run to', 'Stopwatch' or 'Time string');
- Entering time in time string mode can be done in two ways: 1) as a time period or 2) as a time moment during a day.
- 1) To enter time as a time period you can use:
- full format of hours, minutes and seconds: hh:mm:ss, example: 02:30:00 (2 hours and 30 minutes)
- reduced format of minutes and seconds: mm:ss, example: 15:30 (15 minutes and 30 seconds)
- just minutes, example: 15 (15 minutes)
- 2) To enter time as a time moment you have to type prefix symbol "T" and follow it (with or without a space) within a certain time with a standard format of hh:mm:ss or hh:mm. Also you can use AM/PM mark or enter time in 24-h format. Example: "T 10:00" (make countdown till 10:00 AM). When you enter time as a time moment and press Start button time period for countdown automatically calculates based on a current time and a maximum length of period for 24 hours. For example, if current time is 10:20 A.M. and you enter "T 11:00 AM" then period for countdown calculates as 40 minutes, but if you enter "T 10:00 AM" then period for countdown becomes equal to 23 hours and 40 minutes.
- Also you can run GTD Timer in stopwatch mode by entering "S" into Time field.
- Button with semicolon near this field allows to open Set Time window.
- 1) To enter time as a time period you can use:
- Entering time in time string mode can be done in two ways: 1) as a time period or 2) as a time moment during a day.
- Message (optional) - enter message that identifiers the timer or reminds you what to do when countdown finishes. This message will be displayed on the timer's window, shown as hint if you move mouse pointer over the timer's tray icon and displayed as pop-up balloon in System Tray when countdown finishes.
Buttons:
- Stopwatch - starts GTD Timer in stopwatch mode (activates configurable Stopwatch preset)
- Work - configurable button, with default settings activates "Pomodoro: Work Session" preset
- Break - configurable button, with default settings activates "Pomodoro: Break Session" preset
- Start (default button, Enter key) - starts timer with time entered in Time edit field, the button active only if this field contains correct time
- Cancel (Esc key) - cancels and closes dialog box, GTD Timer can be started from its main window
If checkbox "Show this window on startup" is checked then this window appears when GTD Timer started, otherwise you can open this window using button on timer's window or via popup menu accessible from timer's icon.
Configuring GTD Timer
To open timer configuration dialog call Settings menu item from GTD Timer Tray Icon context menu (do right mouse click on timer's icon to open the menu).
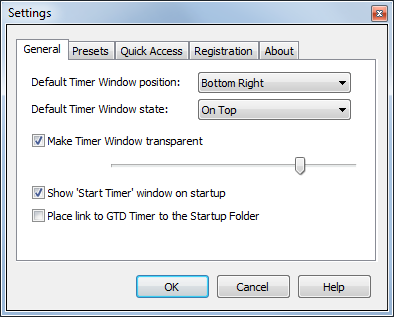
General tab
General settings tab is shown in the picture below.

This tab allows to specify general parameters for the program:
- Default Timer Window position - choose where to show timer's window on the screen (Top Left, Top Right, Bottom Left, Bottom Right)
- Make Timer Window transparent - use Opacity slider control to set how transparent should be timer's window (move slider to the left to a make window more transparent)
- Stay on Top - shows timer window on top
- Show 'Start Timer' window on startup - shows time selection window when the timer starts
- Place link to GTD Timer to the Startup Folder - allows to run the software when the system starts
Presets tab
Preset settings tab is shown in the picture below.
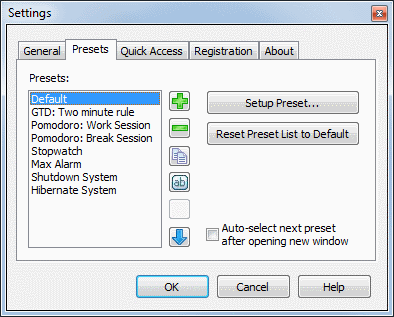
Presets include numerous parameters to precisely configure software behavior for every specific task.
Use this window to create, remove, duplicate and reorder presets.
Click Setup Preset button to access Preset Setup window.
Select checkbox Auto-select next preset after opening new window to allow GTD Timer automatically select next preset when opening time select window.
Quick Access tab
Quick Access tab is shown in the picture below.
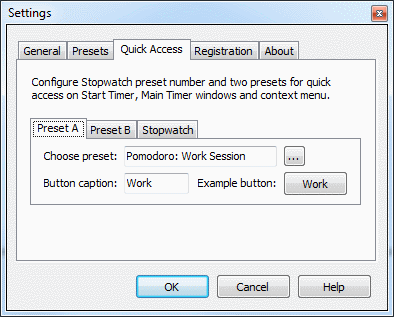
This tab allows to link buttons in Start Timer and Main Timer window with custom presets. You may choose two custom presets A and B buttons and configure one preset for Stopwatch button.
Using and configuring presets
GTD Timer allows to create presets - sets of parameters used to recall predefined settings for the software.
Presets may include:
- Time and Message (if time is not included into some preset, the software asks for time when the preset is activated)
- Option to start main timer window minimized and restore it on countdown completion
- Alarm sound and Ticking sound (it is possible to use any custom audio file in .WAV format)
- Timer actions on countdown completion (stop counting, count overtime, restart with same or another preset, quit application)
- Command-line action to run when countdown finishes (or no command by default)
- Option to choose custom fonts in timer window including different colors for different software states
- Option to display time with precision up to milliseconds
- Tray Icon font name, size and color
Use presets to create customized sets of settings for every specialized task. You may quickly recall presets from drop-down menu, keyboard shortcuts (Alt + Preset number in main timer window) or run GTD Timer from command line with preset number as parameter.
To access presets configuration open Presets tab in Settings dialog (Settings dialog accessible via Tray Icon context menu item Settings).
Presets tab is shown in the picture below.
Use this window to add, remove, rename, duplicate, reorder presets, access Setup Preset dialog, reset list of presets to default if required.
The checkbox Auto-select next preset after opening new window used to automatically select next preset in time selection dialog when multiple copies of the software running.
To access preset configuration dialog press Setup Preset... button.
Setup Preset dialog appears (shown in the picture below).
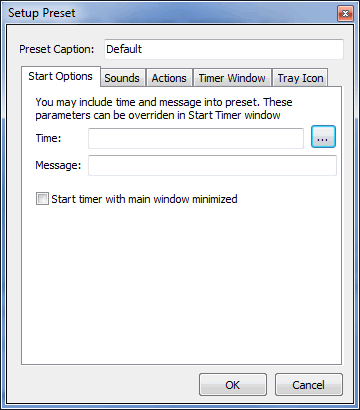
Use Preset Caption field to name preset. It is recommended to use such a name that helps you easily distinguish different presets.
You may include Time and Message into preset. Theses parameters can be overridden in Start Timer window.
Check Start timer with main window minimized to hide main window when timer starts.
Sounds tab is shown in the picture below.
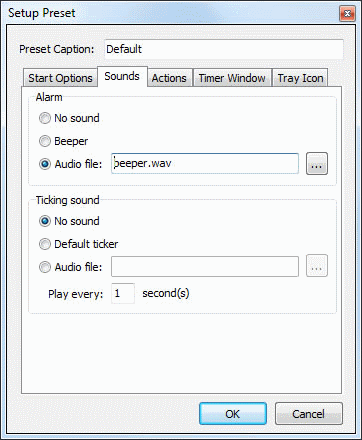
Configure Alarm sound to play when timer finishes countdown.
Configure Ticking sound and set period to play when timer is counting.
You may choose any audio file in .WAV format for Alarm in as well as for Ticking sounds.
Actions tab is shown in the picture below.
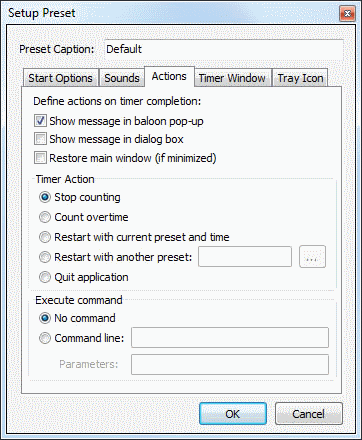
Use this tab to setup actions on countdown completion.
You may configure:
- Indication (show message in balloon pop-up or restore main window)
- Timer Action (allows to stop counting, count overtime, restart with current or another preset, quit application)
- Command line
Command lines run using operating system ShellExecute function.
Examples of command lines:
- Force to shutdown system:
Command: shutdown
Parameters: -s -f -t 00 - Open "D:\Documents" folder:
Command: D:\Documents
Parameters: <Leave empty> - Open e-mail client with address user@example.com:
Command: mailto:user@example.com
Parameters: <Leave empty> - Navigate to URL http://productivity-science.com
Command: http://productivity-science.com
Parameters: <Leave empty>
Timer Window tab shown in the picture below.
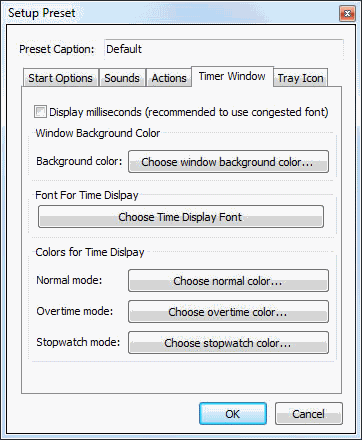
Use this tab to setup time display in main timer window.
You may enable option to display milliseconds, configure time display font and colors for different timer modes.
Tray Icon tab shown in the picture below.
![]()
Use this tab for setup Tray Icon display options for the timer.
You may setup Tray Icon font name and size (recommended to use Small Fonts with size 6 or 7 pt) and text color.
Setting different colors for different presets help to distinguish between multiple running instances of GTD Timer.
List of keyboard shortcuts
Use the shortcuts to manipulate GTD Timer from the keyboard
Main window shortcuts
While using main window shortcuts be sure that main window has input focus (do mouse click on timer's window, icon for example).
List of shortcuts:
- Space - start timer
- Enter - open Start Timer window
- S - stop timer
- P - pause timer
- Keys 1, 2, 3..0 - start timer with number of minutes from 1 to 10
- Alt + Keys 1, 2, 3..0 - activate preset with number from 1 to 10
- W - activate Stopwatch preset
- A - activate Quick Access Preset A
- B - activate Quick Access Preset B
- R - open Presets menu
- T - open Set Time window
- E - open settings window
- H - hide (minimize) main window
- O - switch on/off Stay On Top feature
- F1 - open Help
- X - exit GTD Timer
Start Timer window shortcuts
List of shortcuts:
- Enter - start timer (only if time entered and Start button enabled)
- Esc, Alt-F4 - cancel input, close window
- Tab (Shift-Tab) - move forward (backward) between fields
- Alt-Down Arrow - open drop down lists
- Alt-H - set/clear checkbox Show this window on startup
Starting GTD Timer From the Command Line
GTD Timer timer can be run from command line. You can create one or multiple shortcuts to the software executable (gtdtimer.exe) and pass parameters to it. Alternatively you can start timer from batch files.
Remember to precede executable file name with full path where the software was installed or add the path to the system environment PATH variable.
Usage:
gtdtimer.exe /T=MM:SS [/M="Message Text"] [/P=Profile number] [/ID=ID Number]
Parameters:
- /T - Time to countdown, format is the same as used in Start Timer window. This parameter is obligatory.
- /M - Message string for the timer, use double quotes to enclose messages with spaces. This parameter is optional.
- /P - Preset caption. This parameter is optional, used first profile if omitted.
- /ID - Unique number for each running instance. If software instance with this ID is already running, it exits and new copy replaces it. By default, ID is equal to zero.
Examples:
- Start GTD Timer and countdown till 18:00 with message "Time to go home"
gtdtimer.exe /T=T18:00 /M="Time to go home" - Start GTD Timer and countdown for 10 minutes with message "End of a break!"
gtdtimer.exe /T=10 /M="End of a break!" - Start GTD Timer, countdown for 45 minutes with message "System shutdown" and use previously configured profile number 5 to run command to shutdown computer (see examples of commands in preset configuration section):
gtdtimer.exe /T=45 /M="System shutdown" /P="Shutdown System"
Purchasing and Registering the Software
GTD Timer is a commercial software distributed on try-before-buy approach - you may test full version of the software for 15 days. At the end of 15-day evaluation period you should purchase a license and register the software or stop using it and uninstall it from your computer.
Purchasing a License and a Obtaining Serial Number in order to Register the Program
You can purchase a license and obtain a serial number from the GTD Timer website: http://GTD-Timer.com or from official Productivity Scientific website: http://ProductivityScientific.com. Please note that the actual purchase transaction is performed by our partners - registration services that are well-known and secure companies. The Productivity Scientific company does not have access to your financial information (like a credit card number, etc.) during the entire process and after the transaction.
While obtaining the license, you should provide your full name and e-mail address. For security reasons the Productivity Scientific company will send your serial number only to the provided e-mail address.
Serial numbers for all our software delivered immediately after end of the purchase transaction. You can use registered version of the software just few minutes after starting the transaction.
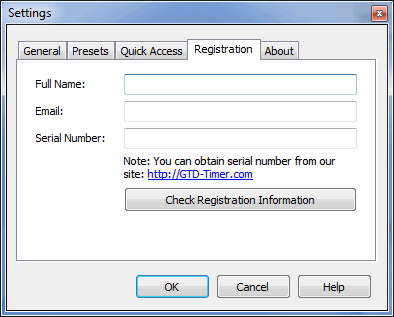
Registering the Program
To register the program you have to enter your full name, e-mail address and serial number to the corresponding fields on the Registration tab of the Settings dialog box.
The Registration tab is shown in the picture below.